Table of Contents
PIC10F322 ADC and PWM for LED Brightness Control
In this guide, we will explore how to control the brightness of an LED using the PIC10F322 microcontroller by combining its Analog-to-Digital Converter (ADC) and Pulse Width Modulation (PWM) features. This method allows for precise brightness control based on the input from a potentiometer.
Overview
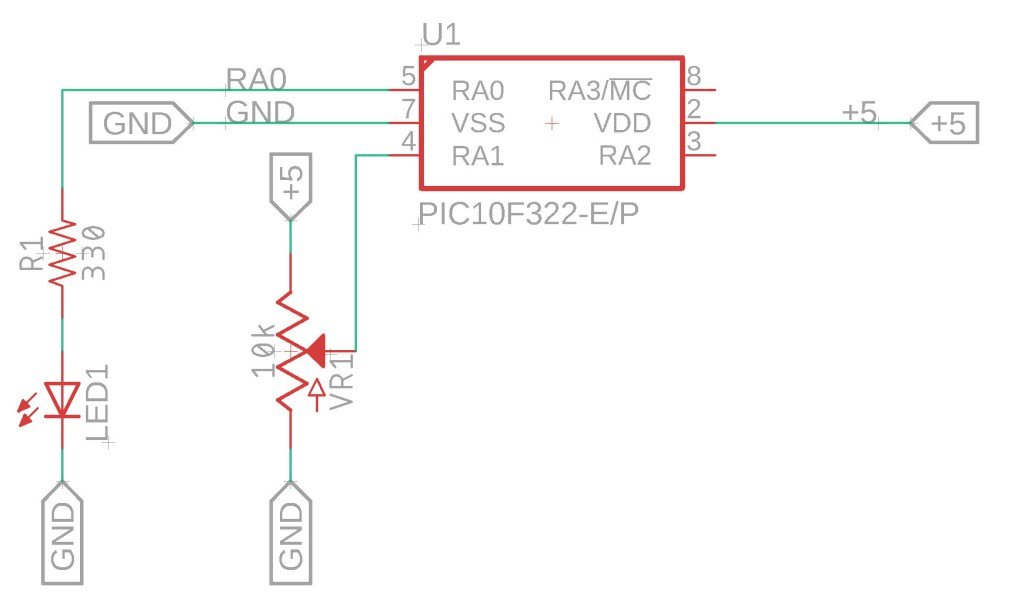
Previously, we covered the basics of using the ADC on the PIC10F322 to read values from a potentiometer. Now, we will extend that knowledge to adjust the brightness of an LED connected to RA0, using the potentiometer connected to RA1.
This setup can be expanded to control larger loads, such as motors, by using a transistor to handle the increased current requirements. This topic will be covered in a future post.
The Circuit

And now… for the code.
The following code reads the value from the potentiometer using the ADC and adjusts the PWM duty cycle to control the brightness of the LED.
/*
 * File:   adc_pwm.c
 * Author: Jamie
 *
 * Created on 9/14/2021, 8:04 PM
 */

#include <xc.h>
#include <stdint.h>

//Device Configuration
#pragma config FOSC = INTOSC  // Oscillator Selection
#pragma config BOREN = ON    // Brown-out Reset
#pragma config WDTE = OFF    // Watchdog Timer
#pragma config PWRTE = ON    // Power-up Timer
#pragma config MCLRE = OFF   // MCLR Pin Function Select bit->MCLR pin function is digital input, MCLR internally tied to VDD
#pragma config CP = OFF      // Code Protection
#pragma config LVP = OFF     // Low-Voltage Programming
#pragma config LPBOR = ON    // Brown-out Reset Selection bits
#pragma config BORV = LO    // Brown-out Reset Voltage Selection
#pragma config WRT = OFF    // Flash Memory Self-Write Protection

//Used to calculate the delay time - Change depending on processor Speed
#define _XTAL_FREQ 16000000  //16Mhz


//Prototypes
void setup(void);
uint8_t ADC_Read(void);
void set_dutycycle(volatile uint8_t* pDutyCycleHigh, volatile uint8_t* pDutyCycleLow, uint16_t dutyValue);

void setup(void){
    //Set the System Clock - You can change this to match the setting you are looking for
    OSCCONbits.IRCF = 0b111;  //Set System Clock to 16Mhz

    //Pin LED is connected to
    TRISAbits.TRISA0 = 0;  //Make pin Output A.0
    ANSELAbits.ANSA0 =0;   //Disable Analog A.0

    set_dutycycle(&PWM1DCH,&PWM1DCL,0); //Clear Duty Cycle for PWM1

    PR2 = 0xFF;
    T2CONbits.T2CKPS = 0b00;
    T2CONbits.TMR2ON = 0x01;
    PWM1CONbits.PWM1OE = 0x01;   //PWM1 Turn on
    PWM1CONbits.PWM1EN = 0x01;  //PWM1 Enable Output


    TRISAbits.TRISA1 = 1;  //Make pin Input A1
    ANSELAbits.ANSA1 =1;   //Enable Analog A1

    //Set Analog conversion clock FOSC/32, since we are running 16Mhz, we need to have a conversion time at or greater 1uS
    //FOSC/32 will give us 2uS
    ADCONbits.ADCS = 0b010;

    //Select the Analog channel - A1 or AN1
    ADCONbits.CHS = 0b001;

    //Turn on the ADC module
    ADCONbits.ADON = 1;
}

void main(void)
{
    setup();

    while(1){

        uint8_t ADC_Value = 0;
        ADC_Value = ADC_Read();  //Read the ADC Value
        uint16_t ADC_adj_Value = ADC_Value * 4; //PWM is running at 10bits. ADC is 8bits. We will fluff it up some
        set_dutycycle(&PWM1DCH,&PWM1DCL, ADC_adj_Value); //Set the Duty cycle of PWM1
        __delay_ms(500);  //Wait .5 second and do it again

    }
}

uint8_t ADC_Read(){
    //Starts the ADC read and waits until a conversion is complete before returning
    //Returns the ADC value
    ADCONbits.GO_nDONE = 1;  //Start the conversion

    while (ADCONbits.GO_nDONE == 1){
        NOP();
    }

    return ADRES;
}

void set_dutycycle(volatile uint8_t* pDutyCycleHigh, volatile uint8_t* pDutyCycleLow, uint16_t dutyValue)
/*Sets the duty value of the supplied registers.
 *Usage set_dutycycle(&PWM_duty_register_high,&PWM_duty_register_low, duty_value)
 *Valid range for 10bit resolution is 0 - 1023
 *TO convert percent to value, lets say we want 33%.  1023 x .33 = 337.59  round it to 338.
 *338 would be the value we enter for the duty.  */
{
    *pDutyCycleLow =  (uint8_t)((dutyValue & 0b11) << 0x06);  //Get the LSB
    *pDutyCycleHigh = (uint8_t)(dutyValue >> 0x02);    //Get the MSB
}
How the Code Works
- Device Configuration:
- Sets various hardware options, including oscillator selection and power-up timer settings.
- Setup Function:
- Disables the analog function on PORTA.0 and configures it as an output.
- Configures PORTA.1 as an analog input.
- Sets up the ADC module and selects the analog channel.
- Configures PWM on PORTA.0 by setting the PWM period, initial duty cycle, and enabling PWM mode.
- Main Loop:
- Continuously reads the ADC value from the potentiometer.
- Scales the 8-bit ADC value to a 10-bit PWM value and adjusts the LED brightness accordingly.
Summary
By combining the ADC and PWM features of the PIC10F322, you can create a flexible and efficient method for controlling LED brightness. This guide provides a comprehensive setup and detailed code example, demonstrating how to read an analog input and adjust the PWM duty cycle to control the brightness of an LED. This approach can be expanded to control larger loads with the addition of a transistor, providing even greater versatility for your microcontroller projects.
Need a Creator Alchemist on Your Project?
I’m available for hire—consulting, systems design, embedded tech, creative problem-solving, or anything in between.
If you’ve got a project that needs someone who can think it through and build it out, I’m interested.
👉 Let’s Talk
jamie@jamiestarling.com
