Table of Contents
A Simple Traffic Light Controller Using PIC10F322 and XC8
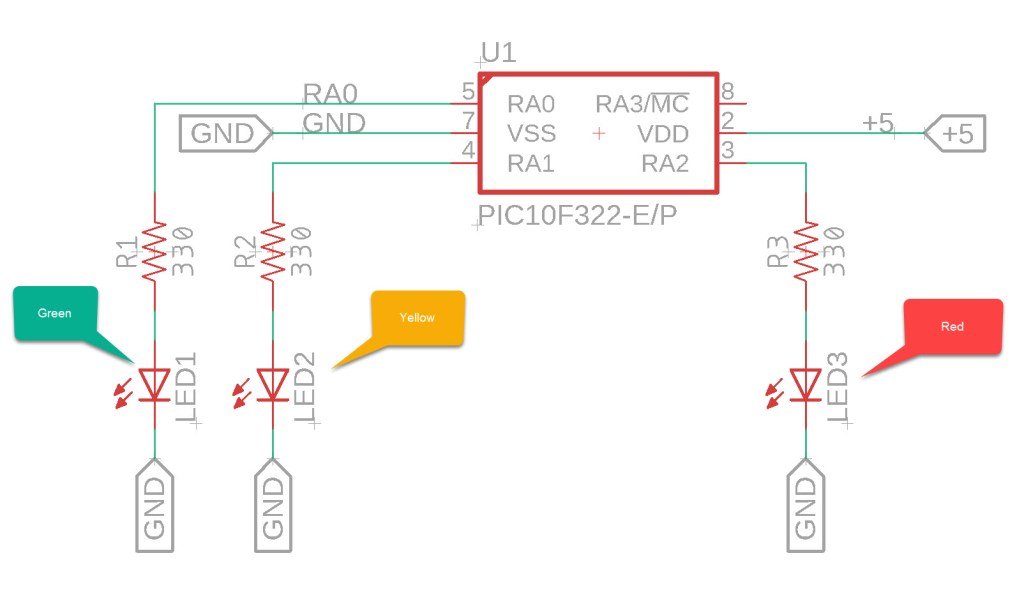
No model train layout is complete without a traffic light to add realism. This guide provides a simple traffic light system driven by a PIC10F322 microcontroller. The default light cycle times are 4 seconds for green, 1 second for yellow, and 4 seconds for red, repeating continuously.
The Traffic Light Circuit based on PIC10F233

XC8 Code for Traffic Light
/*
 * File:  traffic_light.c
 * Author: Jamie Starling - GizoFoundry.com
 *
 * Created on:  September 2, 2021, 7:45 PM
 *
 * Code provided as-is.
 */

#include <xc.h>
#include <stdint.h>

//Device Configuration
#pragma config FOSC = INTOSC  // Oscillator Selection
#pragma config BOREN = ON    // Brown-out Reset
#pragma config WDTE = OFF    // Watchdog Timer
#pragma config PWRTE = ON    // Power-up Timer
#pragma config MCLRE = OFF   // MCLR Pin Function Select bit->MCLR pin function is digital input, MCLR internally tied to VDD
#pragma config CP = OFF      // Code Protection
#pragma config LVP = OFF     // Low-Voltage Programming
#pragma config LPBOR = ON    // Brown-out Reset Selection bits
#pragma config BORV = LO    // Brown-out Reset Voltage Selection
#pragma config WRT = OFF    // Flash Memory Self-Write Protection

//Used to calculate the delay time - Change depending on processor Speed
#define _XTAL_FREQ 8000000  //8 MHz (default after Reset)

//delay time value
#define GREEN_TIME 4000
#define YELLOW_TIME 1000
#define RED_TIME 4000


//Prototypes
void setup(void);
void traffic_led(void);


void main(void)
{
    setup();

    while(1)
    {
      traffic_led();
    }
}

void setup(void)
{
    ANSELAbits.ANSA0 = 0; //Disable Analog A0
    ANSELAbits.ANSA1 = 0; //Disable Analog A1
    ANSELAbits.ANSA2 = 0; //Disable Analog A2

    TRISAbits.TRISA0 = 0; //Set Port.A0 as output
    TRISAbits.TRISA1 = 0; //Set Port.A1 as output
    TRISAbits.TRISA2 = 0; //Set Port.A2 as output
}

void traffic_led(void)
{

    //Green Light
    LATAbits.LATA0 = 1;  //Set Port.A0 High (turn on LED)  GREEN
    LATAbits.LATA1 = 0;  //Set Port.A1 Low  (turn off LED) YELOW
    LATAbits.LATA2 = 0;  //Set Port.A2 Low  (turn off LED) RED
    __delay_ms(GREEN_TIME);  //delay

    //Yellow Light
    LATAbits.LATA0 = 0;  //Set Port.A0 Low  (turn off LED) GREEN
    LATAbits.LATA1 = 1;  //Set Port.A1 High (turn on LED)  YELLOW
    LATAbits.LATA2 = 0;  //Set Port.A2 Low  (turn off LED) RED
    __delay_ms(YELLOW_TIME); //delay

    //Red Light
    LATAbits.LATA0 = 0;  //Set Port.A0 Low  (turn off LED) GREEN
    LATAbits.LATA1 = 0;  //Set Port.A1 Low  (turn off LED)  YELLOW
    LATAbits.LATA2 = 1;  //Set Port.A2 High  (turn on LED) RED
    __delay_ms(RED_TIME); //delay
}
Customizing the Timing
To change the duration of each traffic light, update the #define statements at the top of the code. The times are defined in milliseconds, so 1000 ms equals 1 second. For example:
- For a 5-second green light:
#define GREEN_TIME 5000
- For a 2-second yellow light:
#define YELLOW_TIME 2000
- For a 6-second red light:
#define RED_TIME 6000
Sum it up
This guide provides a simple way to create a traffic light system using the PIC10F322 microcontroller and XC8 compiler. By following the circuit setup and using the provided code, you can add realistic traffic lights to your model train layout. Customize the timing as needed to fit your specific requirements and enhance the realism of your project.
Need a Creator Alchemist on Your Project?
I’m available for hire—consulting, systems design, embedded tech, creative problem-solving, or anything in between.
If you’ve got a project that needs someone who can think it through and build it out, I’m interested.
👉 Let’s Talk
jamie@jamiestarling.com
